Wednesday, August 26, 2009

Blop Hop Winners!

First off, thank you to all who hopped along with us during our August New Release Blog Hop.

We've got a couple winners to congratulate..

Susan, you won first place... your pick of 4 Character Cafe Digi Stamps!

Julie E, you won our second place prize of 2 Character Cafe Digi Stamps of your choice!

E-mails have been sent to you both, but if you haven't gotten anything as of yet, please feel free to contact us... cyberspace is funny that way sometimes!

Once again, we appreciate all of your support and hope you enjoyed all the inspiration our DT had to offer as well as our new images.

Don't forget to check out this weeks' WIW challenge (a sketch!) & have some fun! See you Friday!

Happy Crafting,
Kendra :)

WIW - Sketcherific!

Hi all, it's that time of the week again, however, this is a sad week for one of our DT Members, Sara. It was her turn to host the challenge this week, however, sadly, there has been a death in her family. We are sending our thoughts and prayers out to her {hugs}...

In her absence, Kelly and I decided to take over and do something we have never done before! A sketch.... ohhhhh daunting and a little bit scary, however, WE DID IT!!!!

Our sketch for you..........


And without further ado, our sample....


A close up of Sierra Golfer, an image that our website members will be receiving via an e-mail blast shortly and she'll be available for purchase in the store soon too. We hope you enjoy!


We used Sierra Golfer from The Character Cafe (yet to be released), coloured with watercolours, on Bazzil cardstock, with DSP paper and button from my stash, the sentiment from Gina K, Spellbinder die, and Offray ribbon.

Alrighty then, should be easy peasy! Use our sketch for inspiration and wow us :) We'll have a draw (through random org) at the end of the week (next Wed am before the new WIW post) to see who will win 2 Character Cafe images of their choice and a chance to be a Guest Designer with us for Feature Friday.
If you're uploading to a gallery (ie splitcoast stampers) please use TCCWIW so we can find you easily.

That's it... hope you have fun and join us :)

Happy crafting,
Kendra & Kelly


Friday, August 21, 2009

TCC August New Release Blog Hop! The End...

Hey there, if you're just checking in here and you haven't been hopping along with us, you should most definitely go to the START and collect all the goodies and inspiration along the way!

If you have been hopping along and you've arrived from Tesa's Blog, then you are in the right spot, the END of the blog hop.

Hopefully, you've gotten the 30% discount code written down somewhere safe, you've collected the freebie and gathered up some inspiration along the way. We've asked you to become a follower of our blog and/or our website and if you've signed up to become a member of our website, we'll be sending you a message with another freebie next week to say thank you!

The discount code is valid until August 25th and we'll be announcing our winners on Tuesday night (before our next Work It Wednesday Challenge).

Don't forget when posting here on the blog to let us know if you've posted about the Hop somewhere so we can add an extra ballot to the cat tree for you!

Wednesday, August 19, 2009

WORK IT WEDNESDAY TUTORIAL - ALTERED BOX AND OUR NEXT CHALLENGE!

Hey, we had some players last week and that means we have a winner too! I did the draw by random org, however, I can't seem to figure out how to get that gadget to show the number that was generated. The number between 1 and 3 that came up was 2 and that means that Piali won our challenge for last week. Piali, you can choose any 2 Character Cafe images that you wish to have. Also, we'd like for you to consider being a guest designer with us next week, August 28th. I'll be e-mailing you with more details :) Thanks to everyone who stopped by, commented and especially those who played along with us! Now on to this weeks challenge...


Good morning and welcome to the Work It Wednesday Character Cafe Tutorial Spot. Today, its me, Elaine from My Creative Corner and I am going to show you how I have altered a simple box :)

Firstly, choose/find an empty box that you think is suitable for altering. I have used a small box that a phone charger came in.

I then opened out the box so that I could use it as a template to cut my pieces of card stock to cover the box using double sided tape to fix into place.

Next I fixed my chosen card stock to cover the box and cut a rectangular scalloped nestie from White Linen Card for the top of my box and attached with double sided tape.

On a piece of smooth white card, I printed out Ziggy Bee (available from the Character Cafe Shop...here) which I then coloured using my Promarkers.

He was then cut out and stickles glitter added to his wings, and then left to dry thoroughly.

While your image is drying, take a piece of ribbon long enough to go around the middle of your box... I fixed mine using double sided tape and then to the center added a matching flower and I also stamped a sentiment onto my rectangular topper.

Once Ziggy was dry I fixed foam pads to the back and then positioned him on the lid of the box.

This is my finished box!

Now onto the challenge... this weeks challenge is to : ALTER SOMETHING! It doesn't have to be a box, it can be anything you can find to alter into something useful!! I am really looking forward to seeing your creations as are the rest of the Design Team :) Please leave a link to your creation in the comments, I can't wait to pop by to look!

Thanks for stopping by!


Wednesday, August 12, 2009

Work It Wednesday #6 - Glitter it up!

Hello there! Welcome to today's Work It Wednesday where I will share my love of all things GLITTERY!

My name is Colleen and my home on the net is Glitter Ink. My motto in cardmaking is this: "Glitter makes everything better!" So I usually always find some way to incorporate glitter into my cards. Even if it's only a small, minute detail. Just a little added sparkle makes me smile and I just know the card receiver will smile too!

There are endless ways to add sparkle to a card, whether you are using some sort of blinging rhinestones, glitter applied with glue pen, glitter embossing with a versamark ink pad and heat gun, etc. One of my fave, all time favorite, go-to glitter supplies is: STICKLES!!! They come in so many colors!

It would be easy enough to share how to apply glitter to any given image after it has been colored and mounted on a card, so I thought I would share a very different way to "glitterfy" your creations.

You will need: card base, cardstock, image, paper crimper, stickles (for this project a clear/iridescent color is perfect). I am using Crystal Stickles.


Take your large section of cardstock and run it through the paper crimper.


After that is done you will mount that cardstock onto your card base.


Then you will use your stickles to fill in the lines from the paper crimper.


After your glitter lines are all dry you can finish up your card.


Now it's your turn!!! Show us your works of glitter! You can link your creations here or when uploading to online galleries please make sure to use WIW6 as your keyword. I can't wait to see what you come up with! I love looking at sparkly things!
HERE ARE A FEW MORE SAMPLES FROM MY BLOG:
Glittered Flowers (shows you what just a little sparkle can do)
Glittered Ribbon (I just added the tiniest bit of sparkle to the gift)
Glittered Wings (angel wings are always fun to glitterfy!)
Glittery Dress (of course dresses are always fun to add sparkle to!)
THANKS FOR VISITING! HAVE A SPARKLEY DAY!


Wednesday, August 5, 2009

WIW #5 - Ribbon Play

Character Cafe - Work it Wednesday
Isn’t Ribbon wonderful! Where would be without it!

Hi! My name is Shelley and I am pleased to be part of the Character CafĂ©’s DT and it is my turn for Work it Wednesday. I hope you have all been enjoying the tips, techniques and ideas from our previous DT members and have used them on your cards or other projects.

Well today I want to give you some ideas of how to use ribbon on your cards. Some basic stuff and something a little different I hope you find it fun and helpful. We are using ribbon all the time on our projects and I think it finishes a card of nicely. But let’s try something different with the ribbon.

The first thing we are going to do I learnt from The Next Level challenge blog. I joined in one of their challenges and we had to use this technique on our project. So it thanks to them for this great technique. You’re going to love it!

Once you have stamped and coloured your image, measure and mark your card on the reverse of your image and punch four holes in each corner where the lines cross. Choose your ribbon and measure them against the card so they go from one hole to the next hole and add 1 ½ inches onto this length. Then do this for all four sides. The next thing to do is to tie a knot in the middle of each of the measured pieces of ribbon. Starting with one hole, pass the end of the ribbon from front to back and secure in place with tape on the back. Do the same with the other end of the ribbon and the adjacent hole. Now using this same hole, pass through another piece of the ribbon, again from front to back. So now you have two pieces of ribbon going through one hole. Secure in place. Do this now with the other ribbon pieces and the other holes until the ribbon forms a frame around your image and each hole holds two pieces of ribbon.

Next something a little simpler, we are going to have a go at colouring our ribbon. Yes, I did say colouring it. Now this technique needs you to play around and test out ribbons because all ribbons are made from different materials. The ribbon I am using for this technique is a twill ribbon with small flowers on it. I choose a Copic Pen that matched one of the colours in my image I have already coloured and started to colour alternate flowers, as you can see in the picture. All I used was the very tip of the pen because you don’t want to saturate the ribbon material. You can see it covers very well with no bleeding. You need only the tiniest amount of pressure when doing this. I am going to use this ribbon on my card later.

Finally this is just little embellishment idea for your cards using eyelets. Choose where you would like to place two punched holes on your card, as I have done. Then punch and set your eyelets in place. Next thread two strands of ribbon through both holes and tie of into a knot. Trim the ribbon to your desired length. See pictures above. You can leave it like this or you can dangle a tag or another embellishment from the ribbon as I have done on my finished card.

You’re Challenge
Now your challenge this week is to include just one or more of these ideas on your project. I really enjoyed playing with ribbon and am I sure you will too. You will be amazed at what you create. All you need to do is PLAY!
It would be great to see what you do for this challenge. So leave us a comment with a link to your project, which could be your personal blog or your gallery at SCS.


Work It Wednesday – by Shelley at Artful Achievements


Wednesday, July 29, 2009

Work It Wednesday Tutorial - How to Create a Scene on your cards or Projects - Three different types of Scene Tutorials and lots of Pics for examples!

WIW #4 Winner..... s

Okay, so we haven't been having all that much participation in the challenges and well, I figure that the 2 who took the plunge last week both deserve a prize for coming out! We appreciate your efforts ladies and so we'll be offering you both a prize from The Cafe. However, for purposes of the Guest Designer Spot, and the challenge, we've done the draw...

Okay, I'm not totally sure how this is supposed to be, but when I first did this, it came up with #2, however, it doesn't seem to stay generated (sorry for my ignorance in such matters!)

Congrats to Vivi, you can have your choice of 2 images from The Cafe and we'll be contacting you a little later today with details, but we'd love it if you would consider being part of our Feature Friday next week (Aug 7) as a Guest Designer. Tracy, we'll also be contacting you regarding a prize! Thanks for playing along and be sure to check out this weeks WIW #5 below for more fun.


Tutorial - Creating a
Scene with your Cards

Hello,
.......
Well today is my scheduled post to give a tutorial we call Work It Wednesday over at The Character Cafe Design Team Blog and also on my own.
.......
Each week one of us DT girls is giving you a tutorial on some fun exciting technique to help expand on your current stamping abilities (Hopefully LOL!!!)
.......
I decided to teach just how I create many of my Scenes on my Cards. Once you get the Hang of it, it really is not very hard to do and then you can have lots of fun doing it!!!
.......

For my first type of scene we are going to start with Sponging on your background. You will need 1 piece of White Card stock. Since Scenes take up more room than most cards I some times make my Scene cards up to 5 x7" or 6x6" depending on what I am doing but some are the regular 4 1/4" x 5 1/2" too. You will Begin to learn what size you want as you practice making scenes on your cards.

.......

O.K. start off with a 5 x 7 piece of SU Whisper White Card Stock. You will also need some craft or even make up sponges will do. Then I usually have 3 colors of Blue Ink, 3 colors of Green ink, 2 colors of Brown ink, and Whisper White SU craft ink for the clouds.
For my Blues I usually use SU ink pads in Bashful Blue, Brocade Blue, and Ballet Blue this gives me a soft blue main coat a brighter blue to do highlighting and a darker blue to do shading on my sky.
.......
Start by sponging your main blue (here it is bashful blue) across your page in long swipes or short swipes whatever you prefer.
.......
See below I just keep swiping it in sections until I get it across the whole page.
Now you have your main blue all the way across you can either start on your other shades of blue or move onto your green. Here I went straight to Green, but you will see why maybe I should have either used more sponges or not started on the green until I finished all 3 shaded of the Blue!!! LOL!!!!!
For my Greens I use SU inks in Garden Green as the main Green and Green Galore and Old Olive as my dark and bright accent greens. So swipe the sections like you did with the Blue only this time we are putting a dirt road in the middle of the patches of grass so only do about 1/3 of the card from left to right.
Now you can start from right to left and do the other 1/3 of the card I am not sure why the right side is looking darker because at this point they were the same shade of green.


So now you can finish off the two other shades of green or move onto the Brown on a new sponge depending on what you prefer as you learn your Technique. I usually use one side of the sponge for my blue the other side for my green and a different shade for my browns so my browns do not take over my other colors later.
.......
For my Browns I use SU inks in Close To Cocoa, and Chocolate Chip Close to Cocoa being the main color on my paper, and Chocolate Chip to add the accents and defining shaded places of my scene.
Here you can see where I started with the Close to Cocoa made my initial dirt road then accented the edges with Chocolate Chip and added little swipes of Chocolate Chip on into the dirt road to give it dimension.
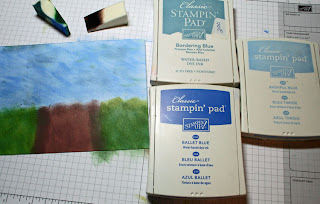
Now above I have started to go back and add my other two shades of blue putting down the brown inked sponge and picking up the blue one. First I used the Ballet Blue because it is the brighter of the two Accent Blues. I just swiped it here and there along the whole sky.
Now below you will see why I maybe should have finished the blue before the green because as I was swiping my last bits of the 3rd Blue Brocade Blue (a blue with Grays in it for shading in the sky) my sponge actually left some of the green in the swipes from the other side of my sponge I used for the grass.
Now I went back and added the other two shades of green for the dimension and shading in my grassy areas. You can see the brighter and darker shades make the grass have a more realistic look now and it also helps fill in any white areas you may have left out earlier.
So above I took a picture of the Scene and the 3 Blue inks I used.

Here is the scene and two of the greens I used I also added Green Galore but I put that pad away before I took this picture.
Finally here is the Scene and the two shades of Browns I used for the dirt road.
Now it is time to add more to the scene and Trees in the background of the scene really add depth to the card. So I got out my SU Lovely as a Tree set and inked up trees using my SU Chocolate Chip Marker for the Bark of the Trees and SU Garden Green Marker for the Leaves on the trees.
In this picture above you can see where I inked the bark areas up first since there are less of them and I did not want to cover them up with the green and not be able to see them. I have done this both ways brown first then Green and Green first then brown.
So above you can see the first tree stamped into the background and below you can see the final product when you are done. I printed off my Character Cafe Syd Golfer and colored him up with my Copics (that would be another tutorial for you coloring with Copics) and cut him out and popped him up from the image with excess foam and Rubber from my stamps.
.......
Now onto another type of Scene Use of Sponges and Copics mixed together to get the Sky and Grass of the Scene.
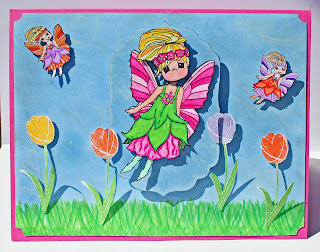
This tutorial will teach you how to make the Scene above with The Character Cafe Fairy Belle image.
On the right you can see my final product and off the the right you can see how I got there. I made the whole card then put it on my big shot and cut out the Labels 4 nestie shape out then I added a piece of white card stock behind the cut out and sponged some blue around the edges so the white did not show through and then I put the popped up cut out part of my Scene back onto the card.
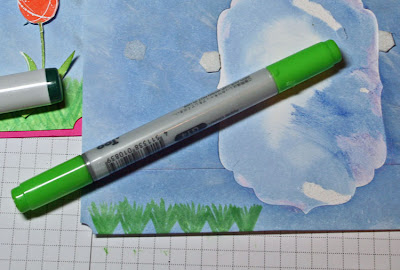
So for our Purposes today I am going to take the extra card I had left from making that particular scene and turn it upside down to show you how to create the Grass. You already saw above how I made the Sky in the Scene it was the same way on this one too.
So I take 3 shades of my Copics in Green I use G06, G05, and G28 usually for a bright light green a darker bright green, and a dark green.
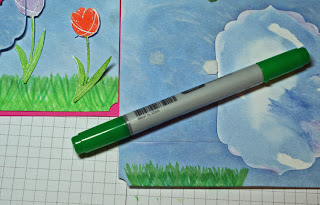
.......
On the first part of the grass I take my lightest bright green and make grass marks in a V shape patches all the way across the card.
Now I take the mid tone green that is still in a bright shade and fill in the open bottoms of the V shape patches you see above.
Last I take my Darkest shade of Green which is not bright at all but a dark shade to add dimension and shading to the grass.
Now I go back over the whole section of Grass with my lightest shade to blend in all 3 colors of the Greens. This way you still see the dimension, but it is softer not as harsh as it is before the blending.
.......
So then I just went to my stamps and picked out some whimsical looking flowers and stamped them up and cut them out and added them to my Fairy Scene popped up with SU Stampin Dimensional's. You can see they were also partly cut out when I did the labels 4 Nesties Pop up part of the Scene.
.......
Last Scene Tutorial - Creating Scenes with a solid color Card Stock backing.
.......
Now onto our last type of Scene. This type starts off with Blue Card Stock as your background. You can take Whisper White Ink again and swipe it accross the card for the clouds, and you can leave it at that or if you want more dimension to your sky you can bring in some swipes of the darker shades of Blue also. In the card below I only added the Whisper White swipes for the clouds.
.......
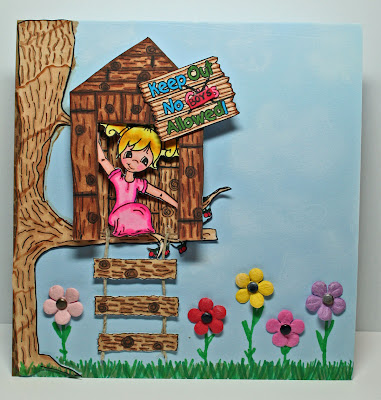
So for this Scene you start off with a piece of Bashful Blue SU Card Stock. I made the Clouds and the Grass with my Copics and the Whisper White Craft Ink and a Baby Wipe.
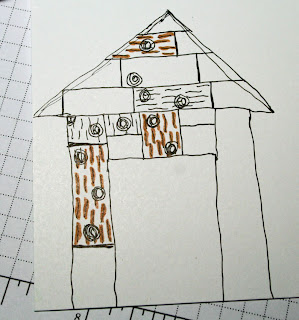
So I wanted to add a Tree house to The Character Cafe Image. I just roughly drew out a tree house that would fit over the super cute little girl climbing the tree above.
.......
Then I drew in the wood grain marks on the boards I drew onto the Tree House.
Next I drew on the Nots in the wood by just roughly drawing a circle and filling it in with swirling circles very very easy!!!
Now I took my darkest shade of Brown (you will need 3 shades of Brown Copics I used E31, E35, and E39.) I traced over the wood grain marks with my darkest brown.
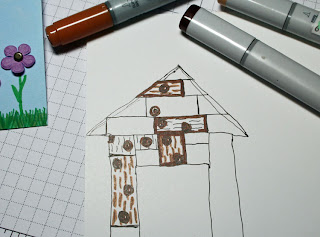
Then I also outlined my wood pieces with that same dark brown.
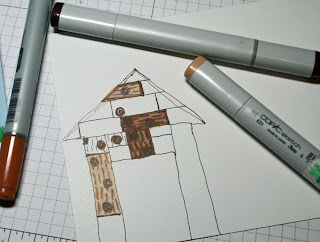
Next I colored in the wood pieces with the lightest shade of brown and also added some shading with the middle shade of brown as well.
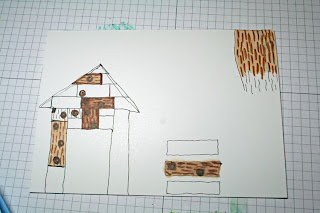
In this picture you can see how I added onto the Tree that our Sweet Character Cafe image is climbing in to make it big enough for the Tree house to fit onto the Tree over the image.
.......
You can also see how I made the hanging Wood slat ladder hanging from the Tree House, and the rest of the tree house. When all your coloring is done just cut out your images they can be jagged as you are working with wood.
.......
One last variation of this type of Scene is to create the Dirt and the grass with solid colored Green and Brown Card Stock intead of doing any coloring or sponging you just do tearing as seen below.
.......

So I hope now you can feel more comfortable making scenes with your cards they really are pretty simple and fun to do and you can come up with a ton of variations on how to create Scenes of all types.
.......
Below you can see some of the different types of Scenes I have created over the last year in blog world!!! LOL!!!!
.......
I hope you enjoyed my Tutorial and if you have any questions let me know I would be glad to help you in anyway I can!!!!
.......
Do not forget if you play along in our challenge this week then you can earn a Guest Designer Spot on the Character Cafe Team with us and a chance at some great Free Character Cafe Images too!!!!! What could be better than that??? So go on and go make a Scene for us!!!
If you would like to upload your card to SCS Gallery (or others for that matter!) note TCCWIW5 please so we can find you. Oh, and let us know!
........
One thing I love about The Character Cafe images is that they are perfectly drawn for creating Scenes which you will find not all stamps are but many can be.
.......


Here are some of my Past Scenes:


.......

Heather