WIW #4 Winner..... s
Congrats to Vivi, you can have your choice of 2 images from The Cafe and we'll be contacting you a little later today with details, but we'd love it if you would consider being part of our Feature Friday next week (Aug 7) as a Guest Designer. Tracy, we'll also be contacting you regarding a prize! Thanks for playing along and be sure to check out this weeks WIW #5 below for more fun.
Tutorial - Creating a Scene with your Cards
Okay, so we haven't been having all that much participation in the challenges and well, I figure that the 2 who took the plunge last week both deserve a prize for coming out! We appreciate your efforts ladies and so we'll be offering you both a prize from The Cafe. However, for purposes of the Guest Designer Spot, and the challenge, we've done the draw...
Okay, I'm not totally sure how this is supposed to be, but when I first did this, it came up with #2, however, it doesn't seem to stay generated (sorry for my ignorance in such matters!)Congrats to Vivi, you can have your choice of 2 images from The Cafe and we'll be contacting you a little later today with details, but we'd love it if you would consider being part of our Feature Friday next week (Aug 7) as a Guest Designer. Tracy, we'll also be contacting you regarding a prize! Thanks for playing along and be sure to check out this weeks WIW #5 below for more fun.
Tutorial - Creating a Scene with your Cards
 Hello,
.......
Well today is my scheduled post to give a tutorial we call Work It Wednesday over at The Character Cafe Design Team Blog and also on my own.
.......
Each week one of us DT girls is giving you a tutorial on some fun exciting technique to help expand on your current stamping abilities (Hopefully LOL!!!)
.......
I decided to teach just how I create many of my Scenes on my Cards. Once you get the Hang of it, it really is not very hard to do and then you can have lots of fun doing it!!!
.......

For my first type of scene we are going to start with Sponging on your background. You will need 1 piece of White Card stock. Since Scenes take up more room than most cards I some times make my Scene cards up to 5 x7" or 6x6" depending on what I am doing but some are the regular 4 1/4" x 5 1/2" too. You will Begin to learn what size you want as you practice making scenes on your cards.
.......

O.K. start off with a 5 x 7 piece of SU Whisper White Card Stock. You will also need some craft or even make up sponges will do. Then I usually have 3 colors of Blue Ink, 3 colors of Green ink, 2 colors of Brown ink, and Whisper White SU craft ink for the clouds.
 For my Blues I usually use SU ink pads in Bashful Blue, Brocade Blue, and Ballet Blue this gives me a soft blue main coat a brighter blue to do highlighting and a darker blue to do shading on my sky.
 .......
Start by sponging your main blue (here it is bashful blue) across your page in long swipes or short swipes whatever you prefer.
.......
See below I just keep swiping it in sections until I get it across the whole page.
 Now you have your main blue all the way across you can either start on your other shades of blue or move onto your green. Here I went straight to Green, but you will see why maybe I should have either used more sponges or not started on the green until I finished all 3 shaded of the Blue!!! LOL!!!!!
 For my Greens I use SU inks in Garden Green as the main Green and Green Galore and Old Olive as my dark and bright accent greens. So swipe the sections like you did with the Blue only this time we are putting a dirt road in the middle of the patches of grass so only do about 1/3 of the card from left to right.
 Now you can start from right to left and do the other 1/3 of the card I am not sure why the right side is looking darker because at this point they were the same shade of green.
So now you can finish off the two other shades of green or move onto the Brown on a new sponge depending on what you prefer as you learn your Technique. I usually use one side of the sponge for my blue the other side for my green and a different shade for my browns so my browns do not take over my other colors later.
.......
For my Browns I use SU inks in Close To Cocoa, and Chocolate Chip Close to Cocoa being the main color on my paper, and Chocolate Chip to add the accents and defining shaded places of my scene.
 Here you can see where I started with the Close to Cocoa made my initial dirt road then accented the edges with Chocolate Chip and added little swipes of Chocolate Chip on into the dirt road to give it dimension.
 Now above I have started to go back and add my other two shades of blue putting down the brown inked sponge and picking up the blue one. First I used the Ballet Blue because it is the brighter of the two Accent Blues. I just swiped it here and there along the whole sky.
 Now below you will see why I maybe should have finished the blue before the green because as I was swiping my last bits of the 3rd Blue Brocade Blue (a blue with Grays in it for shading in the sky) my sponge actually left some of the green in the swipes from the other side of my sponge I used for the grass.
 Now I went back and added the other two shades of green for the dimension and shading in my grassy areas. You can see the brighter and darker shades make the grass have a more realistic look now and it also helps fill in any white areas you may have left out earlier.
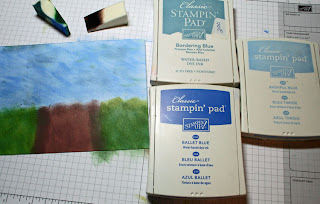 So above I took a picture of the Scene and the 3 Blue inks I used.
 Here is the scene and two of the greens I used I also added Green Galore but I put that pad away before I took this picture.
 Finally here is the Scene and the two shades of Browns I used for the dirt road.
 Now it is time to add more to the scene and Trees in the background of the scene really add depth to the card. So I got out my SU Lovely as a Tree set and inked up trees using my SU Chocolate Chip Marker for the Bark of the Trees and SU Garden Green Marker for the Leaves on the trees.
 In this picture above you can see where I inked the bark areas up first since there are less of them and I did not want to cover them up with the green and not be able to see them. I have done this both ways brown first then Green and Green first then brown.
 So above you can see the first tree stamped into the background and below you can see the final product when you are done. I printed off my Character Cafe Syd Golfer and colored him up with my Copics (that would be another tutorial for you coloring with Copics) and cut him out and popped him up from the image with excess foam and Rubber from my stamps.
.......
Now onto another type of Scene Use of Sponges and Copics mixed together to get the Sky and Grass of the Scene.
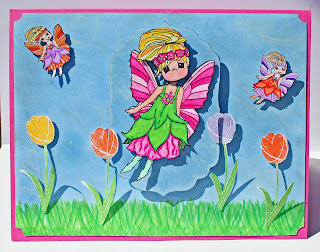
 This tutorial will teach you how to make the Scene above with The Character Cafe Fairy Belle image.
This tutorial will teach you how to make the Scene above with The Character Cafe Fairy Belle image.  On the right you can see my final product and off the the right you can see how I got there. I made the whole card then put it on my big shot and cut out the Labels 4 nestie shape out then I added a piece of white card stock behind the cut out and sponged some blue around the edges so the white did not show through and then I put the popped up cut out part of my Scene back onto the card.
 So for our Purposes today I am going to take the extra card I had left from making that particular scene and turn it upside down to show you how to create the Grass. You already saw above how I made the Sky in the Scene it was the same way on this one too.
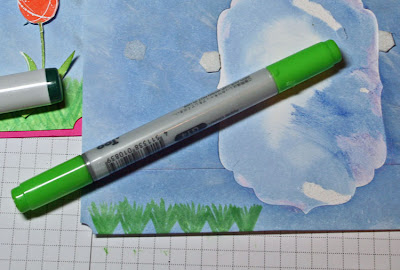 So I take 3 shades of my Copics in Green I use G06, G05, and G28 usually for a bright light green a darker bright green, and a dark green.
 .......
On the first part of the grass I take my lightest bright green and make grass marks in a V shape patches all the way across the card.
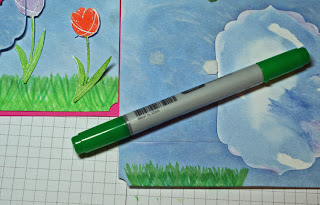 Now I take the mid tone green that is still in a bright shade and fill in the open bottoms of the V shape patches you see above.
Now I take the mid tone green that is still in a bright shade and fill in the open bottoms of the V shape patches you see above. Last I take my Darkest shade of Green which is not bright at all but a dark shade to add dimension and shading to the grass.
 Now I go back over the whole section of Grass with my lightest shade to blend in all 3 colors of the Greens. This way you still see the dimension, but it is softer not as harsh as it is before the blending.
.......
So then I just went to my stamps and picked out some whimsical looking flowers and stamped them up and cut them out and added them to my Fairy Scene popped up with SU Stampin Dimensional's. You can see they were also partly cut out when I did the labels 4 Nesties Pop up part of the Scene.
.......
Last Scene Tutorial - Creating Scenes with a solid color Card Stock backing.
.......
Now onto our last type of Scene. This type starts off with Blue Card Stock as your background. You can take Whisper White Ink again and swipe it accross the card for the clouds, and you can leave it at that or if you want more dimension to your sky you can bring in some swipes of the darker shades of Blue also. In the card below I only added the Whisper White swipes for the clouds.
.......
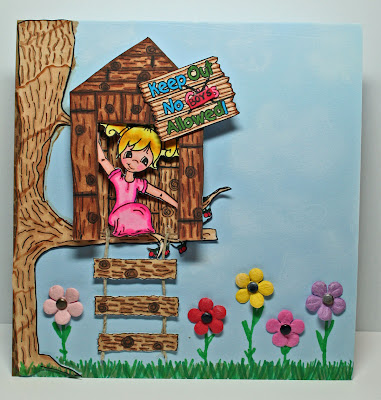 So for this Scene you start off with a piece of Bashful Blue SU Card Stock. I made the Clouds and the Grass with my Copics and the Whisper White Craft Ink and a Baby Wipe.
 So I wanted to add a Tree house to The Character Cafe Image. I just roughly drew out a tree house that would fit over the super cute little girl climbing the tree above.
.......
 Then I drew in the wood grain marks on the boards I drew onto the Tree House.
  Next I drew on the Nots in the wood by just roughly drawing a circle and filling it in with swirling circles very very easy!!!
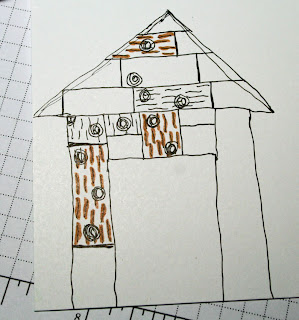 Now I took my darkest shade of Brown (you will need 3 shades of Brown Copics I used E31, E35, and E39.) I traced over the wood grain marks with my darkest brown.
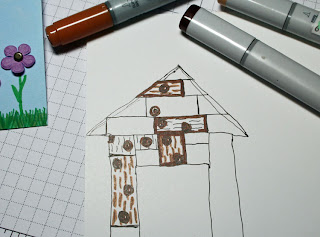 Then I also outlined my wood pieces with that same dark brown.
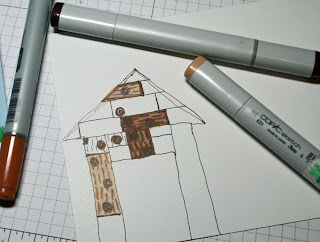 Next I colored in the wood pieces with the lightest shade of brown and also added some shading with the middle shade of brown as well.
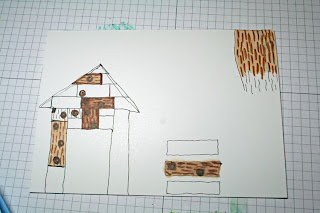
In this picture you can see how I added onto the Tree that our Sweet Character Cafe image is climbing in to make it big enough for the Tree house to fit onto the Tree over the image.
.......
You can also see how I made the hanging Wood slat ladder hanging from the Tree House, and the rest of the tree house. When all your coloring is done just cut out your images they can be jagged as you are working with wood.
.......
One last variation of this type of Scene is to create the Dirt and the grass with solid colored Green and Brown Card Stock intead of doing any coloring or sponging you just do tearing as seen below.
.......

So I hope now you can feel more comfortable making scenes with your cards they really are pretty simple and fun to do and you can come up with a ton of variations on how to create Scenes of all types.
.......
Below you can see some of the different types of Scenes I have created over the last year in blog world!!! LOL!!!!
.......
I hope you enjoyed my Tutorial and if you have any questions let me know I would be glad to help you in anyway I can!!!!
.......
Do not forget if you play along in our challenge this week then you can earn a Guest Designer Spot on the Character Cafe Team with us and a chance at some great Free Character Cafe Images too!!!!! What could be better than that??? So go on and go make a Scene for us!!!
If you would like to upload your card to SCS Gallery (or others for that matter!) note TCCWIW5 please so we can find you. Oh, and let us know!
If you would like to upload your card to SCS Gallery (or others for that matter!) note TCCWIW5 please so we can find you. Oh, and let us know!
........
One thing I love about The Character Cafe images is that they are perfectly drawn for creating Scenes which you will find not all stamps are but many can be.
.......
Here are some of my Past Scenes:


.......
Heather